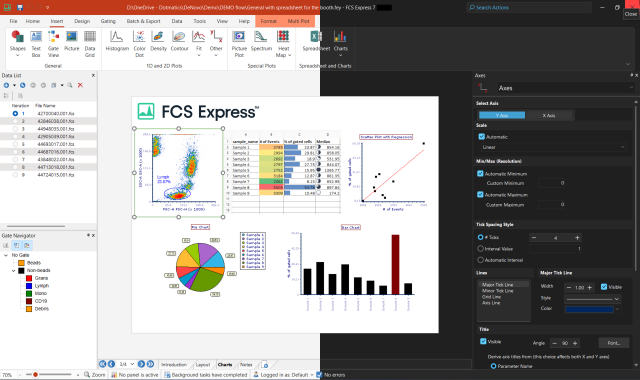
This page provides tips to assist you while you import your BD FACSDiVa Experiment files.

Using the Preferences to customize your plots

When importing your FACSDiVa experiments into FCS Express, all the experiment's plots will be recreated on your Layout. Each plot's format settings (i.e. fonts, axes labels, plot resolution, overlay settings, etc.) can be configured after a plot has been created, by right-clicking on the plot and selecting Format. A plot's settings can also be set before a plot is created, by configuring the FCS Express plots' Preferences (File --> Edit Preferences). Since importing your FACSDiVa experiment will recreate all your plots in FCS Express, it is important to make sure that the plots that are being created automatically are displayed in the manner that you prefer. Therefore, we recommend that you configure your plot's settings in the Preferences before you import your FACSDiVa experiments. Among the plot settings that you will most likely want to configure are:
  • The plot's Legend visibility: Displaying the legend takes away viewable space from the plot, therefore you could consider hiding the legend if your FACSDiVa experiment displays many plots on a page.
  • The histogram's resolution: Typically the histogram resolution is set to be derived from the FCS File. However, since high resolution data has so many channels, there end up being very few events in each channel. Lowering the resolution to 1024 should provide appropriate looking histograms.
  • The plot's title: The title for plots is set by default to the keyword <$FIL>, which represents the data file name. However, the file names as exported from Diva are usually numerical values without any connection to your experiment. To make the title of the plots more meaninful, set it to "<Tube Name>" (without the quotes).

Setting the axes' scale

When you import your experiment into FCS Express, your plots are displayed with the axes scale settings that are stored in the experiment file. You are not obligated to keep your plots with these axes scales. For example, the imported plot is displayed with 5 decades, however, you want it displayed with 4 decades. You can also change the scale between linear and logarithmic. To change a plot's axes settings, follow these instructions:

  1. Right-click on the plot, and select Format.
  2. From the Formatting screen, select the Axes tab.
  3. You can now change the settings of either the X or Y axis, or both. To change the scale between logarithmic and linear, click on the axis that you want to change, and then change the scale, by clicking on the arrow down, on the right of the scale drop-down box. If you enable the AutoScale checkbox, FCS Express will use the scale stored in the FCS file header. (The scale property in the header is set to linear for all FCS data files acquired using FACSDiVa)
  4. The axis range, if set to Automatic, is taken from the FCS file header. For FCS files acquired using FACSDiVa, the range is set to 0 - 262144. If you want to change this, uncheck the Automatic field in the Range section, and then enter the new range in Maximum and Minimum fields. To show 4 decades, enter 26 as the minimum value.
  5. Click OK to save the changes.


The FCS Express FACSDiVa configuration file

As part of the import process, FCS Express will guide you using our FACSDiVa import wizard. One of the wizard screens allows you to set up an FCS Express FACSDiVa configuration file. This is required because the FACSDiVa Experiment file does not contain information about the page size and where the page breaks should appear. For example, a FACSDiVa Experiment file only says that there are 3 plots laid out horizontally next to each other, but says nothing about whether the plots should all be on a single page, or one plot per page. Once you have set up the page size and page breaks for the FACSDiVa Experiment file, you can save this configuration for use again on other FACSDiVa Experiment files. Typically, you will only set up one configuration file and it use it over and over again, however, if you change the page setup in the DIVA software, you will be required to create a new FACSDiVa configuration file.


The above image shows the wizard screen for setting the FACSDiVa™ layout configuration. The Logical Page Size section allows you to configure how the FACSDiVa Experiment file will be divided when it is imported into FCS Express. It displays all the dot plots and histograms from the FACSDiVa Experiment, using mock diagrams to represent the appropriate plot. By clicking in the representation of the FACSDiVa Experiment file page, you can divide the Experiment into multiple pages. After the initial click, you will see a dotted vertical line which represents the right side of each layout page, and a horizontal dotted line, which represents the bottom of the layout page. If a plot is split across more than one page in the diagram, it will be placed on the layout page where its top-corner exists, however, it will not fit completely on the layout page. By default, the ratio of the page is locked, which means that as the width of the page increases, so does the height. The figure below shows a FACSDiVa Experiment with 3 plots that is divided into 3 layout pages.


Viewing FCS data files by their header information

When you export a FACSDiVa experiment file, your FCS data files are given names that are not informative (123456.FCS). To make it easier for you to work with these files, FCS Express allows you to view your FCS files by their tube name, or any other information that is stored in the FCS file header (i.e. Sample ID, acquisition date, etc.). To see more on this feature click here. The tube name keyword in data files generated by FACSDiVa files is "<Tube Name>" (without the quotes).


"FACSDiVa" is trademark of Becton Dickinson

 
De Novo Software